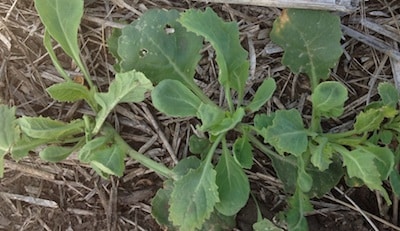
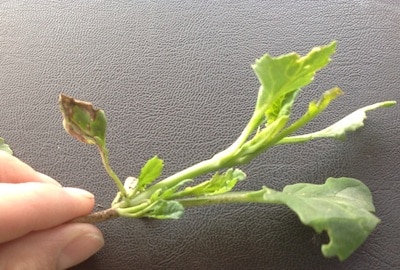
Tank mixes used for pre-seed burnoff ahead of cereals often contain Group 2 and Group 14 products that can hang up in sprayer plumbing. These residues can be particularly damaging to canola.
Common canola-crop herbicides and surfactants left in a tank for any extended period of time are very good at removing these residue deposits from tank walls and sprayer plumbing, causing them to mix in with the spray solution. If wind or rain delays spraying, the concentration of scrubbed-free herbicide residue in the tank can continue to increase.


This underlines the importance of a complete clean out between products, and of an understanding of what risks each product and each tank mix presents.
The following tips will help prevent crop injury from sprayer contamination:
Spray immediately after filling and spray until the tank is empty. All herbicides must be crop-safe at twice the label rate to be registered, so going over previously sprayed crop to empty the tank should not damage the crop. Reduce the rate to be certain, and if applying a second pass, keep in mind what area has already received the higher load of herbicide for the season. Second, add 10x the sump’s remnant of clean water, circulate, and spray it out in the field as well. Repeat.
Look for solid herbicide residue. Some herbicides may precipitate out of solution and many dry herbicides use clay as a carrier. These particles can become trapped in some parts of the sprayer or plumbing. Visual inspection can identify these problem areas and ensure that they are cleaned properly.
Apply direct pressurized spray to all parts of the tank wall.
Empty the sump as completely as possible by spraying it out. The only way to remove the remaining herbicide is through dilution by repeatedly adding water and each time draining the sump as much as possible.
Pump clean water through the boom. Check that all return and agitation lines also receive clean water. Flush all residue. This may require opening and closing various valves several times, and repeating the process with new batches of clean water.
Many small washes better than one big one. For example, a single 600 gal wash is as effective as two washes with 70 gallons each, and three with 30 gal each, assuming a 10 gallon sump remainder.
Filters. Nozzle screens and in-line filters can be a significant reservoir for undiluted or undissolved herbicide and are one of the most overlooked parts of sprayer decontamination. Remove all filters and nozzle screens and thoroughly clean these with fresh water. Run clean water through plumbing leading to the screens.
Nozzle bodies. When rinsing the boom, rotate through all nozzles in a multiple body. Remove screens that may have been used with herbicide, even if just for a short while.
Tank cleaning additives. Check herbicide product labels to see which cleaner is recommended. For some, ammonia alone is enough. For some, a detergent (surfactant) alone is enough. For others, a combination of both is required. All-Clear is one example of a combination product. Finish and Flush are examples of ammonia-based products.
Rinsate disposal. Always spray out the tank in the field. Do not drain the tank while stationary unless you are certain it is free of pesticide and that you are away from sensitive areas and waterways. Another option is to build a biobed for rinsate disposal near the yard. A biobed is a clay-lined hole filled with a mixture of topsoil, peat or compost, and straw. This rich microbial environment can speed the breakdown of pesticides. Biobeds are a new concept in Canada but are considered a best management practice in Europe. Read about the latest AAFC research.
Further reading:
How to identify a spray contamination issue
Spraying before a rain
Tips for spraying in the wind
Weed management timing – scenarios
